Jeep Parts Wiki | Ford Parts Wiki
Home | Search | Browse | Marketplace | Messages | FAQ | Guest
Prev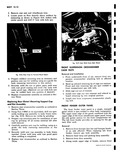

 Next
Next
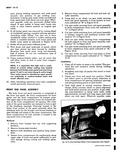
compartment weatherstrip sufficiently to prevent damage during cutting and welding operations 5 Remove cowl top grill panel 6 If damage to fender extends into windshield opening it will be necessary to remove windshield glass assembly and remove fender panel at windshield pinchweld If fender panel is undamaged at this area remove old panel by cutting at area indicated by broken line in Figure 10 10 Sectioning new fender at this location will save time and labor 7 Using drill or air chisel cut spot welds securing V A A r 770 FENDER PANEL WHEEL HOUSE PANEL SECTION A A Fig 10 10 Fender Panel Attachment a1 Windshield Cowl and Wheelhouse FRONT FENDER OUTER PANEL r i Y k v t A 1 L Fig 10 11 Fender Panel Welds at Hinge Pillar and Rocker Panel 1 fender panel to body hinge pillar and rocker panel indicated in A in Figure 10 11 8 Cut spot welds that attach front fender panel to body front panel assembly and headlamp pocket panel indicated at A in Figure 10 12 9 Along upper inner edge gutter area cut spot welds that secure fender panel to wheelhouse upper panel indicated at A Figure 10 12 10 Cut spot welds securing fender panel to cowl top center panel indicated B in Figure 10 12 If windshield has been removed cut welds securing fender panel to windshield pinchweld indicated at C Figure 10 12 NOTE When replacing left front fender panel it will be necessary to salvage gas tank filler neck housing from original fender or replace it with new housing prior to installation of new fender outer panel Installation 1 Clean off all sealer at areas to be welded This prevents fire and excessive smoke during welding operations 2 Straighten and align all panels that attach to fender outer panel 3 Place new panel into position and hold in place using locking pliers or clamps Make sure rubber gasket is positioned properly at joint of gas tank filler neck cover and gas tank filler neck pocket 4 Check and adjust panel to provide proper alignment with adjacent parts If new fender panel is to be sectioned forward of windshield opening mark and trim new panel Prepare new and old panels for splicing 5 Tack weld panel at several locations and remove clamps Maintain constant check on panel alignr a B A ee p e 4 SEALING STRIP AREA C llll Fig 10 12 Fender Panel and Front End Panel Welds in Headlamp Area Typical