Jeep Parts Wiki | Ford Parts Wiki
Home | Search | Browse | Marketplace | Messages | FAQ | Guest
Prev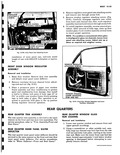

 Next
Next
3 To install quarter window run channel position channel to the side roof rail and body lock pillar then snap rose bud clips into the retaining holes 4 Install quarter window garnish mouldings REAR QUARTER DROPPING WINDOW ASSEMBLY AND OR LOWER SASH CHANNEL CAM Removal and Installation 1 Lower rear quarter window and remove rear quarter trim assembly 2 Partially detach inner panel water deflector sufficiently to remove lower sash channel cam attaching screws fig 10 92 3 Detach window assembly from lower sash channel cam Tilt window as indicated by dotted lines in Figure 10 92 and remove window assembly from between quarter panels 4 To remove lower sash channel cam remove rear guide attaching screws Fig 10 99 then detach cam from front guide and regulator arm rollers 5 To install rear quarter window assembly or lower sash channel cam reverse removal procedure Prior to attaching window to lower sash channel cam make sure cam is engaged on front guide rear guide and regulator arm rollers Lubricate channel portion of sash channel cam with Lubriplate as specified in the LUBRICATION section Check operation of window and adjust window where required as described under Rear Quarter Window Adjustments n WINDOW REGULATOR ATTACHING SCREWS REAR GUIDE ATTACHING SCREWS y t LOWER SASH CHANNEL CAM ATTACHING SCREWS FRONT GUIDE ATTACHING SCREIN5 a s a f Fig 10 92 Roar Quarter Window Hardware REAR QUARTER WINDOW ADJUSTMENTS Both the front and rear quarter window guides are adjustable forward or rearward to provide proper seating of the window in the glass rim channel and to provide easy operation of the window To adjust rear quarter window remove quarter trim assembly then carefully cut a small slit at front and rear guide screws fig 10 92 Loosen both front and rear guide attaching screws Operate window to full up position making sure window is all the way forward and up into the run channels Snug up the upper attaching screw of the front guide and the forward attaching screw of the rear guide Lower window to the full down position then tighten all attaching screws of both front and rear guides To seal slits in water deflector at front and rear guide attaching screws cement using weatherstrip adhesive neoprene type a piece of 2 wide waterproof body tape over each slit Press tape to assure a watertight seal REAR QUARTER WINDOW REGULATOR Removal and Installation 1 Remove rear quarter window and lower sash channel cam 2 Remove front guide lower attaching screw and loosen upper attaching screw Swing lower end of guide against body lock pillar 3 Remove regulator attaching screws fig 10 92 and remove regulator assembly through loading hole 4 To install window regulator assembly reverse removal procedure Lubricate regulator guides and sash channel cam as specified in LUBRICATION Section REAR QUARTER WINDOW FRONT GUIDE Removal and Installation 1 Remove rear quarter window and lower sash channel cam 2 Remove front guide attaching screws fig 10 92 disengage guide from roller on window lower sash channel frame and remove guide from between quarter panels 3 To in tall rear quarter window front guide reverse removal procedure Lubricate channel portion of guide with Lubriplate and adjust window as described under REAR QUARTER WINDOW ADJUSTMENTS REAR QUARTER STATIONARY WINDOW Removal 1 Remove rear quarter window front and upper garnish moldings