Jeep Parts Wiki | Ford Parts Wiki
Home | Search | Browse | Marketplace | Messages | FAQ | Guest
Prev

 Next
Next
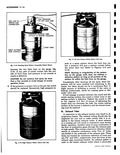
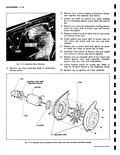
r through the heater case and should be installed properly on the flanged portions of the heater case between case and heat exchanger This is to prevent products of combustion from being drawn into the system O Heat Exchanger I The heat exchanger is constructed of heavy duty stainless steel and should seldom need to be replaced Failure of the heat exchanger would be detected by the presence of products of combustion in the air being delivered to the passenger compartment P Relay If combustion blower runs but heater fails to ignite connect jumper wire from black to white wire of relay If heater then ignites replace relay SERVICE VENTILATOR BLOWER MOTOR REPLACEMENT Refer to Figures 11 11 and 11 12 f 1 Disconnect electrical connection to blower motor 2 Remove the five screws attaching the motor and fan assembly to the blower case and remove motor fan and gasket 3 Remove the nut clip or loosen the set screw securing the fan to the motor shaft and separate fan from motor and mounting plate assembly 4 Install fan on new motor install nut clip or tighten set screw to secure fan to motor shaft and reinstall motor fan and gasket into blower case 5 Connect wiring to blower motor BLOWER MOTOR R WIRE SCREWS Fig 11 11 Ventilator Blower Motor Mounting Q Air Leaks Cold air leaks can cause unjustified insufficient heat complaints when the heater is operating correctly Weather strips should be sealed properly and ventilator louvers should be adjusted to close tightly Another source of air entry into the passenger compartment is through the weld seam between the baggage compartment floor pan the toe pan and the dash panel This air leak can be stopped by applying body sealer The left end of the weld seam can be sealed from inside the baggage compartment and the right side from inside the passenger compartment after the floor mat is turned down While the mat is down any unused holes in the dash panel can be sealed and the sponge rubber seal around the steering tunnel can be checked OPERATIONS COMBUSTION BLOWER MOTOR REPLACEMENT Refer to Figures 11 13 and 11 14 1 Disconnect clamp holding combustion hose to blower case assembly and remove hose 2 Loosen white and black wires from clamps disconnect black wire from five way connector and separate black wire from white wire Disconnect green wire from 3 way connector at relay 3 Remove three combustion blower assembly mounting screws remove ground wire and remove blower and place blower on fender to remove ignition base unit 4 Remove cap and two nuts and lockwashers holding ignition unit base breaker point assembly in place and remove assembly Fig 11 12 Removing Ventilator Blower Fan Nut

 Next
Next