Jeep Parts Wiki | Ford Parts Wiki
Home | Search | Browse
|
Body Service Manual August 1964 |
|
Prev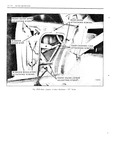
 Next
Next
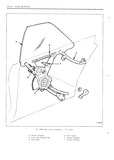
RLLAR QUAlt l E1t ETA CAUTION Support window to prevent it from On styles with power operated windows dis droppine when cam is removed connect regulator motor wire harness at 1n hne uonnovtor mounted on inboard side of quarter inner Disungage window from front guide and from panel between quarter panels by lifting window upward and inboard CAUTION Do not attempt to disengageper1n nent connector at regulator motori 6 To install reverse removal procedure To facilitate engaging lower sash channel rollers with Disengage wire harness split grommef from front uuide turn front guide adjusting studs out inner panel Feed hnrness and connector tIir u h Igounter clock wise t as far as possible without grommet hole into opening between inner and outei removing from guide then in following order panel engage lower roller in front guide reur cam and upper roller in front guide front cam Once rollers 1 Remove window regulator attaching svrews are engaged proceed with installation Fig 2E29 and remove regulator through l irL iecess hole REAR QUARTER WINDOW REAR GUIDE NOTE The procodtire for removing motor from ALL 37 STYLES regulator is described in the Door Section undt r Door and Quarter Window ltegul itor Fl i i tt t Removal and Installation Motor ASS dlill l H 1 Remove rear quarter trim assembly and inner To install reverse removal procedure lit pnnelactizesshole coverl store all broken inner panel seals as spetritird under Rear Quarter lnner Panel Sealing With window in hulbdown position remove rear guido attaching screws tl ig 2E29 Disengage REAR QUARTER WINDOW ADJUSTMENTS guide from roller on window lower sash h innel ALL 37 STYLES and remove guide To perform any rear quarter windovr i Ijo IL T St u reverse removal 1 C duF ments it is neeessarjv to remove the rear rpi is t t Operate window to determine that guide is properly Ulm l5SRmb1y aligned l To adjust window tore or aft loosen tz r aunt roar guide adjusting stud nuts L1IlIlLiLL t I REAR QUARTER WINDOW FRONT GUIDE screws tF1g ZIQQQI Position window nad unit we ALL 37w STYLES as required then tighten loosened nuts ind screw R V I d Il i 2 To adjust window in or out at belt luxe 1 Remove Fplir qurlrter Wmduw Ilqsemmv N Loosen front guide upper adjusting stud nuts l t f t r i LEZUL Adjust studs tn or out ts reiipiired then previously desC1 tb d tighten loosened stud nuts 2 Remove front guide upper and lower adjusting TR Rdjust Hp uf imLm Um UX Jm IURNLLX stud nuts tFig 2E29 4 Rotate guide forward tclockr pmt WMS www ldjusmm Stud mm Fm REEL 59 Mft S C 1 k SE o mgm Sldcl Adjustr studs in or out as i e juii eu then twat so that lower end of guide is above wheelhouse 4nd smh nuts upper end of guide can be started out access hole HND I m guide 4 To relieve t tore or att binding conditr tz A between front and rear guides loosen frimi ixuide 3 To install reverse removal procedure Prior tuljusumg Stud nuts Mm l L u www Mmchlim LvC t v L to inst 1ll ition lubrieate front guide cams with xpm Olwumg mdU U to fuH up U m l I b i k tE i63O V Ur its EEQUWHIGHL und tighten front guide upper Adjusting stud nuts tr 1 rear guide upper attaching screw Operate wii t Io REAR QUARTER WINDOW REGULATOR to full down position and tighten reinxitxine Itl l ALL 37 STYLES nuts und screws Remcvntuttdlnstqltutiun NOTE When adjusting studs on front u1d in d e certain that adjacent studs are tdjds 5 1 Remove rear quarter window assembly and i qtidily to prevent erenttion of 4 bind betwc r twin front guide as previously described tzhrtnnels