Jeep Parts Wiki | Ford Parts Wiki
Home | Search | Browse | Marketplace | Messages | FAQ | Guest
|
Body Service Manual August 1964 |
|
Prev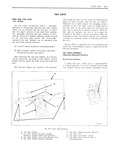

 Next
Next
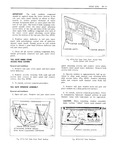
4F IO REAR END gg Kg Check operation of tail gate window and tail gate r V If necessary adjust tail gat e in bodynopening as J T specified under Ta1l Gate Ad ustments J I tu I J tri I A 3 TAIL GATE ADJUSTMENTS SAI I J To adjust the tail gate assembly up or down Y HINGE BOL 5 or in or out in the body opening loosen tail gate Locx screws SUPPORT SCREWS v to hinge attaching bolts 4Fl2 adjustitail gate as required and tighten hinge attaching bolts Fig 4Fl2 T il Gate Lock ond Support 1A GATE NNER pANE WATER DEFLECTOR on rear body cross bar Remove hinge escutcheon covering hinge entrance hole in tail gate outer Ou an Station wagon styles a wat 1 p1 OO pB p 1 l 1 tail gate inner panel water deflector is sealed to the tail gate inner panel and deflects water into the 2 With aid of a helper remove tail gate support hmmm Og the mi gate where it gn drain Out the attavhins Screws Fig 4F12 wd f 1 l Supports bottom drain twigs The bottom Oi the water ae BSHUISI 1 b0 IYl iUi 1 flector is sealed to the inner panel in a manner V that will deflect water towards designated holes 3 Remove tail gate hinge attaching bolts E ig where water can readily mum imo the bmmm Of 4Fl2 and remove tail gate assembly from body thp tBi1gmE 4 To install reverse removalprocedure Prior IT IS IMPORTANT THAT WHENEVER ANY to installation apply a coat of heavy bodied sealer WORK Ib PERFORMED ON THE TATA GATE to surfaces of hinge straps that contact tail gate WHERE THE WATER DEFLECTOR HAR BEEN DISTURBED THE DEFLECTOR MUST BE PROP Clieck operation oi tail gate and if necessary ERLY SEALED TO THE TAIL GATE YNNER adjust tail in body opening as specified under PANEL FOR A COMPLETE RERVICE PRO T m Gate Adjustmgmsy CEDURE OF WATER DEFLECTORS REFER TO THE REAR QUARTER SECTION IN THE BODY SERVICE MANUAL TAIL GATE ASSEMBLY Electrically Operated Window Rem v I und Ins II Iion Remm I and Ins lI i 1 Remove tail gate inner cover trim panel I Open tail gate Remove tail gate window 2 Using a sharp scraper or other suitable tool carefully lift up edge of deflector and detach sealer 2 Remove look cylinder switch and escutcheon and water deflector as required assembly as described under Lock Cylinder Switch and Escutcheon Assembly Removal and NOTE Do not tear water deflector Installation 3 Disconnect harness connectors from regulator lnsI II Iion or Reseuling Procedure motor and ground contact plate at right tail gate lock pillar Detach harness from clips inside tail l If installing old deflector or resealing par gate and harness grommet from tail gate bottom tially detached deflector first inspect deflector for facing and remove harness damage and where necessary repair any tears or holes with waterproof body tape applied to both 4 Complete tail gate removal by periorming sides of deflector steps 1 through 3 as described in Tail Gate As sembly Manually Operated Window Removal and 2 If installing a new deflcctor use old deilector Installation as a template to trim new detlector to proper size 5 To install reverse removal procedure Prior 3 Apply a bead of body caulking compound ap to installation apply a coat ofheavy bodied sealer proximately 3 16 diameter to tail gate inner to surfaces of hinge straps that contact tail gate panel Fig 4F13