| Book |
Page |
Context |
 |
 |
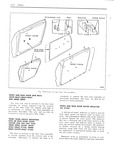
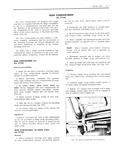
Lind 46000 I If II I I I jIC Series and Fig lE 26 for 38000 48000 and 68000 I II p Series I NI I 5 SASI I CHANNEL IIEIF Figure ...
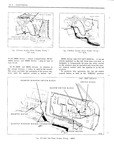
Series and Fig 1E 28 for 38000 48000 and 68000 Fig IF26 Reor Ouurter IIIIindo I Assembly Series I l FI I I rrrrr |
|
 |
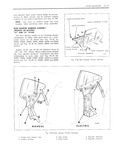
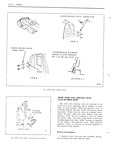
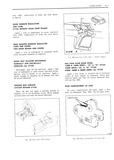
48000 SERIES CEE N5 awv l Removal r1d IDSTDHCHIOVI MODELING CLAY 4 l Remove rear compartment lid lock cylinder I 2 Disconnect vacuum hose from vacuum release tn unit remove vacuum unit attaching bolts ...
lFl6 for Fig lFI3 Re Compartment Lid Lock ond Sniker 35000 36000 38000 45000 46000 and 48000 Series |
|
 |
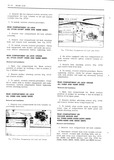
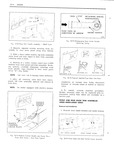
rest cup to through handle into door inner panel hanger plate attaching screws Fig lD20 3 On 48000 series equipped with door pull 7 Remove exposed screws securing door trim handle remove handle to gain ...
remove arm rest base cap Fig lDl8 9 Lift trim assembly upward to disengage it On 38 48000 series remove screws inserted from door inner panel and remove trim assembly through switch base into door |
|
 |
FRONT DELUXE SEAT BEITS WITH RETRACTORS 25 26 35 36 38 45 46 48000 SERIES Fig IH45 L0ck ng Sect Belt Retrcxctor Drum D scriptiom RETRACTOR As Li 0pti0n ...
48000 Remo ul series and its staiinlard eqiiipnient 011 62 63 68000 series seat belts are equipped with sent belt rc 1 Extend 011tb0 1rt1 sent belt t0 full length t1 11nt0rs 011 the 0utb0ard |
|
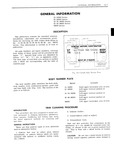 |
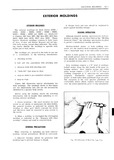
GENERAL INFORMATIOA 1A l 15 16000 Series 25 26000 Series 35 36 38000 Series 45 46 48000 Series 68000 Series DESCRIPTION This publication contains the essential removal installation adjustment and maintenance proce dures for servicing ...
Left upper vertical surface of firewall 35 36 38000 Left upper vertical surface of firewall 45 46 48000 Left upper vertical surface of firewall 68000 Left upper horizontal area of cowl TRIM CLEANING PIROCEDURE INTRODUCTION |
|
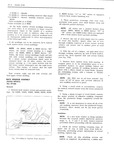 |
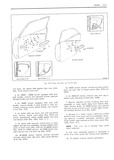
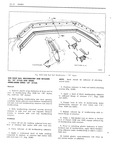
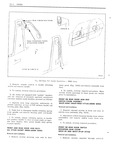
window lower reveal moldings window and secure end to another piece of wood handle NOTE On 38000 48000 68000 Series 69 styles the lower reveal molding is a single 4 With ...
helper cut pull steel wire piece On 38000 48000 to 68000 Series 3 7 through caulking material up side of back window styles the lower reveal moldings right and left across top down opposite side |
|
 |
service part It Ir in FRONT AND REAR DOOR TRIM ASSEMBLIES AI PADDLE 38000 48000 68000 SERIES I III HANDLE I I I A SCREW Remcvulcnd nnsrolloraon 1O 7 1 Remove door inside handles |
|
 |
defleetor 38000 SERIES EXCEPT 38439 is further secured by ii string loaded sealing 38467 38669 STYLES 48000 material along both front and rear edges and by SERIES EXCEPT 48467 STYLES the application of waterproof sealing |
|
 |
WEATHERSTRIP AND RETAINER NOTE Bead should be outboard of attaching ALL 39 STYLES AND 38000 screw slots 48000 68000 SERIES 69 STYLES Removal 4 Position retainer to body and install attaching screws Fig 1D28 |
|
 |
lD46 Door Wedge Plates FRONT DOOR LOCK SELECTOR VALVE 35 36 38 48000 SERIES 2 L g j T The door lock selector valve is attached to the T5 front door trim assembly |
|
 |
that side being appear see step 8 pinched is defective VACUUM DOOR LOCK DIAGNOSIS 35 36 38 48000 SERIES FIGURE D52 E A SYS i Z l 1 11UV 1 Hoses crossed at vacuum |
|
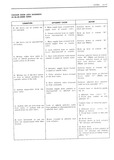 |
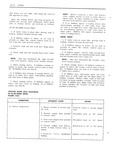
DOORS ll 3T VACUUM DOOR LOCK DIAGNOSIS 35 36 38 48000 SERIES CONDITION APPARENT CAUSE REPAIR B All doors eau be locked but 1 Main supply hose crnssedloek Rgvpysp hosys |
|
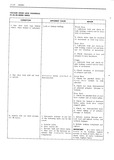 |
DOORS VACUUM DOOR LOCK DIAGNOSIS 35 36 38 48000 SERIES CAUSE I One door lock lass behind Lock or linkage binding Front Door others when locked or unlocked 1 Lubricate lock and check in side |
|
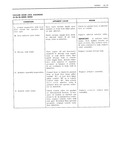 |
DOORS 1D 39 VACUUM DOOR LOCK DIAGNOSIS 35 36 38 48000 SERIES L Lockts inoperative with front Door valve vacuum supply hose Check for pinched hose of affected door closed but operates with pinched |
|
 |
Apply a piece of masking tape over each side of glass and roof 4 On 38000 48000 68000 Se1 ies 39 extension Slit tape vertically at edge of glass so 5 l styles |
|
 |
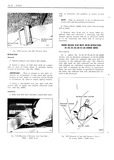
marks on 3 Oh 35000 36000 38000 45000 46000 and lid inner panel and install attaching bolts 48000 Series equipped with rear compartment lid lock vacuum release option disconnect vacuum |
|
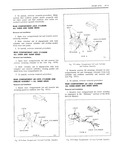 |
install reverse removal procedure Remrwel mid Inslullulion REAR COMPARTMENT LID LOCK CYLINDER ALL 45000 46000 AND 48000 SERIES 1 Raise rear compartment lid and remove nut securing guard to emblem see Fig 1Fll |
|
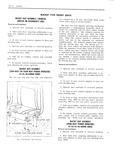 |
ANCHLOR PLATE stun T L 2 FOUR WAY POWER OPERATED TT aw T 25 26 45 46 48000 SERIES I e 9 I Removal mid s a vi jt 1 l Operate seat assembly |
|
 |
molding damage The exterior moldings for Body Series 15000 16000 25000 26000 35000 36000 38000 45000 46000 48000 and 68000 are illustrated in Figures 1K3 thru 1K5 1K6 thru lK9 lKl0 thru Although detailed sealing |
|
 |
Series engine compartment 44 45 68000 Series only CUT OUT SWITCH A cut out 48000 Series and 68000 Series plug in type in switch installed on the left front door arm rest is tuse Inlnck |
|
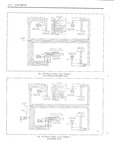 |
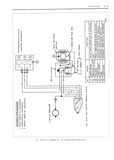
DUNN lr U L1 Fig iLi2 P wer Window Circuit Diqgrcnm T5 i6 25 26 45 46 48000 Series |
|
 |
IL20 Power Ventikztcr Circuit Diagram 25 26 45 46 48000 Series |
|
 |
Disengage 3 wire connector body from the seat motor relay terminal 3 45 46 48000 68000 Series Check feed cir iiftlit Cfititiiiliity HT fuse I l l k 2 Insert one test light lead into |
|
 |
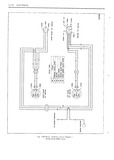
Diugrcnm for I5 Z6 25 26 45 46 48000 SEZZES |
|
 |
Rear Seat 1H23 Moldings 35 36 38000 Series 1l L2l Folding Top Adjustments 1124 Moldings 45 46 48000 Series 11 30 Folding Top Trim Complete 111 Moldings 68000 Series 11 38 Folding Top Trim Less |
|
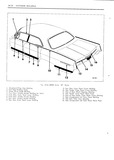 |
48000 snnns 6 1 snles 1 Winzlalwield 1 1r1nr cnn Mnnnrng 9 raw Door one Panel Crown Mnnnang 2 nnnr ann Molding Scalp 10 raw Fender one 1 n 1 Crown Mnndang 2 Center |
|
 |
with ignition switch off connect one end of a 25 26000 45 46 48000 lL13 for 35 36 38000 lLl4 12 gauge jumper wire to by pass feed terminal for 682 68300 and lL15 |
|
 |
szmes n H lll l 9 25 26000 siaruzs as 36 38000 saunas 45 46 48000 ssnuas 68000 saunas m d ng Top 75 76000 saunas l J Roof Pa nel Cover N Exterior Moldings |
|
 |
STYLES coat of Lubriplate to jack screws and seat tracks 4i 00O 46000 48000 SER ES AL L STYLES Operate Seat U limits OF Siu pOSm0 iS App1 A Apply a few drops of dripless |
|
 |
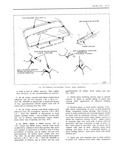
VIEWIN cII cLEA V 1 Lr I652 Fig ID6 DO L PULL PI LLeIIe ILLSLQLIGIIOLL 48000 Series 3 Remove remote control to handle attaching inner panel lD13 and remove assembly from screw and remove handle |